page assembly
- introduction
- conventions — initial file set
- top-level HTML generation control — prolog & epilog
- customizing the
<head>element <!DOCTYPE>declaration- headers and footers
- a complete example
- classic mode notes
This chapter demonstrates how to use directives to create pages with similar structure — the same headers and footers for example — without typing the same text more than once. It also shows how to exploit Xilize's natural mode capabilites for document creation with page ordering and navigation.
introduction
In the most general case, you might like a set of HTML pages to
- have the same header and footer
- use the same CSS stylesheet
- use a common set of definitions
- provide a sensible system of navigation
- use JavaScript
- include material generated from external programs
- have all this be customizable on a page-by-page basis
If you are developing a web site or a significant portion of one, you might also wish that all the pages within a subdirectory share some but not all of these propteries. For instance, a document in a subdirectory may be composed of chapters that have styling and content in common and, while looking similar to the rest of web site, have a certain distinguishing look-and-feel all their own. The chapters need to share styling and content – even JavaScripts – that are not part of the overall look-and-feel of the web site. And, again, each HTML page might have unique requirements.
This is exactly the case for which natural mode was designed. All of this can, of course, also be accomplished with classic mode but at the cost of more of your time and effort.
This chapter shows how to make the most efficient use of Xilize to achieve the ends you desire.
conventions — initial file set
You might begin a project by establishing an initial set of files and a file naming convention to be used in each directory in the project:
*.xil |
each such file corresponds to a generated HTML page |
header.xilinc |
the header material which each page will share |
footer.xilinc |
the footer material which each page will share |
common.xilinc |
to hold the common key/value definitions and URL abbreviations for the file set |
default.css |
the CSS file used by all pages in the directory. You might want to use something more meaningful than default, but initially let's go with that |
page.order |
a file that lists the natural ordering of pages in a directory, one .xil file per line |
*.xilinc |
there may be other files that you'd like to include in serveral of the .xil files and to be consistent you name them with the .xilinc extension since that gives you syntax highlighting in jEdit and Xilize will not automatically translate .xilinc files into individual HTML pages like it will with .xil files. |
Additionally, you might establish the convention that if one of these files is not used in a subdirectory the similarly named file in a parent directory will be used (or more distant ancestor) — except for page.order which must be specific to the directory in which it resides.
natural mode
The conventions described above are exactly those assumed in natural mode.
During natural mode processing of a .xil file,
header.xilinc,footer.xilinc,common.xilincfiles are automatically searched for starting in the (sub)directory of the.xilfile. If not found, the parent directory is examined and, if still not found, the search continues the directory tree to the project root directory.- a similar search is made for a
default.cssfile. However, if a file of that name is not found, another search is made for any*.cssfile in a directory that contains just one such file. - if a
page.orderfile is found in the.xilfile's directory it is used to establish the order of that.xilfile among the other.xilfiles in the directory.
In addition, in natural mode a number of useful keys are set, the value of which you can use in your Xilize markup.
classic mode
Classic mode has no automatic search facility but you can achieve a similar — if less general — result with conditional translation and include file directives (e.g. ifdef. and include.), and the xilize. directive is available as a shorthand to accomplish some of the same effects.
By itself,
xilize.
will set the prolog and epilog keys to true ensuring a proper XHTML file is generated.
It also functions as a define. directive so you can use
xilize. css myStyles.css
title My Web Page Title
headerinc header.xilinc
footerinc footer.xilinc
to accomplish many of the things (see customizing the <head> element below) that natural mode does automatically. However, you will have to set these properties for each and every file in your project, and, if the project includes subdirectories, modify the values to account for changing relative file paths — something that natural mode does automatically.
top-level HTML generation control — prolog & epilog
In natural mode, Xilize by default generates a prolog and epilog — the lines at the top and bottom of the HTML file — which you can customize as described elsewhere on this page.
default prolog:
<!DOCTYPE html PUBLIC "-//W3C//DTD XHTML 1.0 Strict//EN"
    "http://www.w3.org/TR/xhtml1/DTD/xhtml1-strict.dtd">
<html xmlns="http://www.w3.org/1999/xhtml">
<head>
  <meta http-equiv="Content-Type" content="text/html; charset=iso-8859-1" />
</head>
<body>
default epilog:
</body>
</html>
The generation of either the prolog or epilog can be suppressed by setting the corresponding key to false.
| key | value | description |
prolog |
true, false |
adds file <!DOCTYPE>, <html>, and <head> elements and the <body> start tag |
epilog |
true, false |
adds </body></html> to end of input |
For example, to completely replace the Xilize-generated prolog with your own, you could do something like this at the top of an .xil file:
define. prolog false
include. myProlog.xilinc
See below for customizing the contents of the <head> element without having to replace the prolog.
customizing the <head> element
You can customize the <head> element on a page-by-page basis by defining any of the keys in this table:
| key | value | description |
charset |
text | adds meta element with charset spec |
css |
path | adds <link> element to stylesheet located at path |
favicon |
path | adds <link> element for shortcut icon at path in the <head> element |
headElementAdd |
text | adds text immediately before </head> end tag |
keywords |
text | adds a keyword <meta> element containing text in the <head> element |
script 1 |
text | adds <script> element containing text in the <head> element |
style 1 |
text | adds <style> element containing text in the <head> element |
title |
text | adds <title>text</title> |
1 multiple defines for script and style within a file are additive: each define. statement adds to the existing value of the key.
special handling of style & script keys
As the table's footnote states the script and style keys are handled in a special way by Xilize. This allows you to use them several times in the same source file to build up the <style> or <script> element that will be generated in the HTML. One can argue whether or not it's good practice to spread your styling information and JavaScripts around a source file, but it is a great convenience during development and testing of a webpage.
default values
In natural mode, some of these keys are automatically set:
charsetdefaults toiso-8859-1cssis set as a result of natural modes automatic search for*.cssfilestitleis set to the same value as_NaturalLabel_, that is, the first content line in the.xilfile
You can override them as needed.
example
The following example shows the extreme case of all of the head element customization keys being used.
This set of definitions:
define. css myStyles.css
favicon images/myFavicon.png
title Test Document
keywords fun, happy, joyful
define. script
var d = new Date();
document.write("The Universal Coordinated Time is ");
document.write(d.getUTCHours());
document.write(":");
document.write(d.getUTCMinutes());
define. style
.special { background: ivory; }
p.special { letter-spacing:0.3em; color: purple; }
blockquote.special { font-style: italic; }
define. headElementAdd
<meta http-equiv="Expires" content="Tue, 20 Aug 2009 14:25:27 GMT" />
<meta name="Author" content="Andy Streich" />
generate this head element:
<head>
  <meta http-equiv="Content-Type" content="text/html; charset=iso-8859-1" />
  <meta name="keywords" content="fun, happy, joyful" />
  <title>Test Document</title>
  <link rel="stylesheet" type="text/css" href="myStyles.css" />
  <link rel="shortcut icon" href="images/myFavicon.png" />
  <style type="text/css">
.special { background: ivory; }
p.special { letter-spacing:0.3em; color: purple; }
blockquote.special { font-style: italic; }
  </style>
<script type="text/javascript">
<!--
var d = new Date();
document.write("The Universal Coordinated Time is ");
document.write(d.getUTCHours());
document.write(":");
document.write(d.getUTCMinutes());
// -->
</script>
<meta http-equiv="Expires" content="Tue, 20 Aug 2009 14:25:27 GMT" />
<meta name="Author" content="Andy Streich" />
</head>
<!DOCTYPE> declaration
The default <!DOCTYPE> declaration is
<!DOCTYPE html PUBLIC "-//W3C//DTD XHTML 1.0 Strict//EN"
    "http://www.w3.org/TR/xhtml1/DTD/xhtml1-strict.dtd">
The doctype key controls the type of <!DOCTYPE> declaration generated.
| key | value | description |
doctype |
strict, trans, frameset |
adds DOCTYPE declaration |
For example, to use a transitional doctype declaration:
define. doctype trans
which produces:
<!DOCTYPE html PUBLIC "-//W3C//DTD XHTML 1.0 Transitional//EN"
    "http://www.w3.org/TR/xhtml1/DTD/xhtml1-transitional.dtd">
Note: the location of the define. statement within the .xil file has no affect on where the <!DOCTYPE> element is generated in the HTML file. It always appears as the firt line.
headers and footers
In natural mode, the files header.xilinc and footer.xilinc are automatically located and included in the .xil file being processed just after the prolog and just before the epilog to generate the HTML elements following the <body> start tag and preceding </body> end tag. Xilize treats them as if they were include.'d at the top and bottom of the source.
In classic mode, the special keys headerinc and footerinc can be assigned path values for similar if less general results, usually with the xilize. directive which also turns on prolog and epilog generation.
a complete example
Perhaps the best way to get a feel for what you can do with directives is to examine the files used to construct the Xilize2 portion of the Centered Work web site.
install and setup
- get the source files here: download.
- unzip them
- build the project. The easiest way is
- bring up one of the source files in jEdit which has the effect of setting the Project fields in XAA to proper values
- press the Project button.
directory structure
The example Xilize web pages have the following directory structure:
xilize2/— project root directorydownload/— files to be downloaded, not included in the zip fileimages/— favicon and images used in the navigation bars at the top and bottom of each pageexamples/— HTML files used in example browser, generated programmatically from *.xilinc files which are not in the zip package.guide/— the User Guide chaptersimages/— screen shots used in the Guide
page layout
Each page has this layout:
|(headcolor)\2. top nav bar – header.xilinc
|(headcolor){padding: 4em 1em;}. sidebar – header.xilinc |(contentcolor){padding:4em 8em;}. content – *.xil
|(footcolor)\2. bottom nav bar – footer.xilinc
With the top nav bar and sidebar in header.xilinc and the bottom nav bar in footer.xilinc, each .xil file contains only the unique page content.
However, the User Guide displays its own unique sidebar and needs to link the navigation arrows (⇐, &rArr, &uArr) relative to its own directory and page ordering. The following sections explain how that is done.
the footer file, footer.xilinc
The simplest place to start is the footer file footer.xilinc since only its navigation links vary between the project root and User Guide directories.
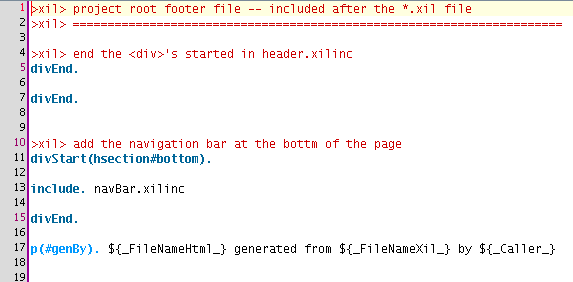
This file resides in the project root directory xilize2 but is used by the User Guide in the guide/ subdirectory as well since this is a natural mode project and there is no guide/footer.xilinc.
Notice the include. navbar.xilinc directive on line 13. Even though footer.xilinc is automatically included in natural mode, it is a normal include file which, not untypically, includes another file. When this occurs — one include file including another — the relative include paths are interpreted with respect to the location of the file in which the include. directive occurs. In this case, footer.xilinc is in the project root directory xilize2 so navbar.xilinc must exist in that directory.
We'll examine navbar.xilinc later, for now notice that line 17
p(#genBy). ${_FileNameHtml_} generated from ${_FileNameXil_} by ${_Caller_}
assigns the id genBy to the paragraph and makes use of the values of several predefined, natural mode keys to generate content.
Lines 5 and 7 provide the </div> end tag for <div> start tags created in header.xilinc which we'll look at next.
the header file, header.xilinc
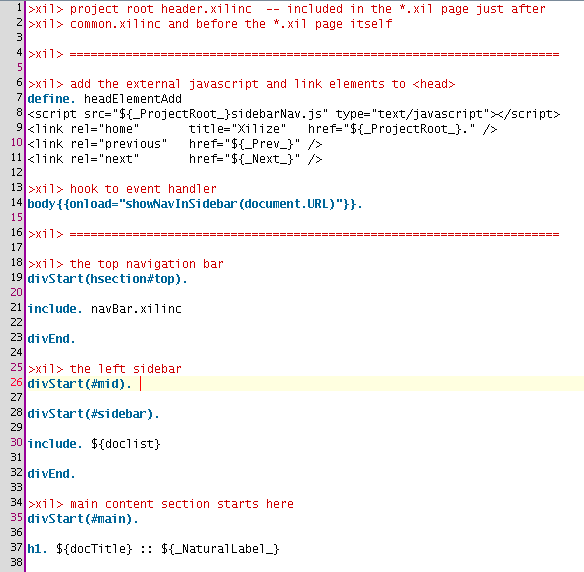
Notice:
- lines 7 – 14 add a bit of JavaScript and make use of of several predefined, natural mode keys. The
headElementAddkey is exceptional in that you may use key values in its definition. - line 21 includes
navBar.xilincjust as thefooter.xilincdoes ensuring the top nav bar looks and behaves the same was as the bottom nav bar. - line 26 and 35 contain
divStart.directives which have no correspondingdivEnd.in this file; that is whyfooter.xilincabove begins with twodivEnd.directives. - line 30 includes a file that is defined elsewhere, in this case in
common.xilinc - line 37 uses a key
docTitledefined incommon.xilincand the key_NaturalLabel_which in natural mode is assigned a value by Xilize (typically the first line in the.xilfile) to create the<h1>element in the generated HTML file.
Let's return to line 30:
include. ${doclist}
Both the project root and the guide/ directories contain a file named doclist.xilinc that is used in the sidebar. The directive include. doclist.xilinc would always find the file in the directory containing header.xilinc — in this cace the one in the project root. So we define the key ${doclist} in each directory's common.xilinc file. Since in natural mode common.xilinc is an autoinclude file, we get the right result.
| doclist value | file in which it is defined |
doclist.xilinc |
xilize2/common.xilinc (in the project root directory) |
guide/doclist.xilinc |
xilize2/guide/common.xilinc (in the User Guide subdirectory) |
The docTitle key on line 37 is handled the same way.
the common include file, common.xilinc
The project root common include:
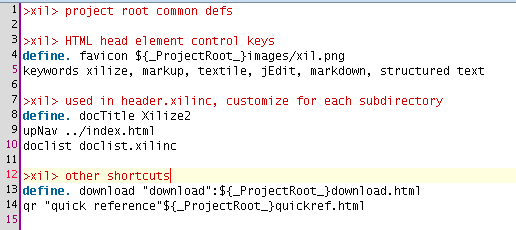
Notice in the project root common include file xilize2/common.xilinc
- lines 4 and 5 configure the
<head>element of the generated HTML - lines 8 – 10 set up key/value definitions for
header.xilinc - lines 13 and 14 provide definitions that can be used by any file in the project
The User Guide common include:
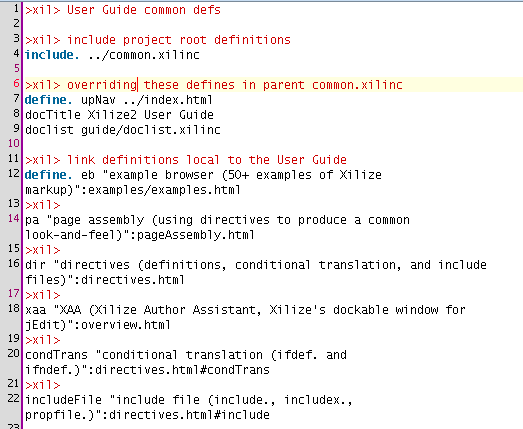
In the User Guide's common include file xilize2/guide/common.xilinc
- line 4 pulls in the project root common include
- lines 7 – 9 set up key/value definitions specific to the
xilize2/guide/directory forheader.xilinc - the rest of the file provides definitions used only in the User Guide.
CSS files
Both the project root and User Guide directories have *.css files that Xilize picks up automatically in natural mode. The User Guide guide.css looks like this:
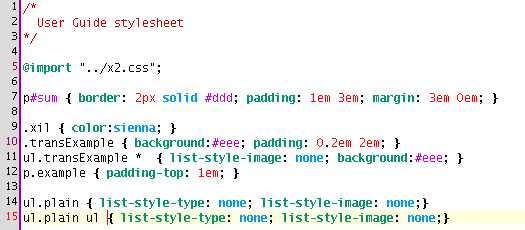
Notice it imports the project root CSS file to achieve the same look as the project root pages, then adds styling particular to the guide.
In addition some of the guide pages use define. style to further specialize styling for individual files.
page ordering, page.order
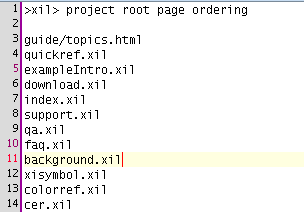
Both the project root and the User Guide directories contain page.order files.
The project root page order file:
The User Guide page order file:
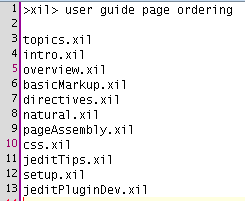
The one and only use of page.order files is to have Xilize set the _Prev_ and _Next_ keys to the corresponding previous and next HTML pages so those keys can be used in your markup to provide navigation to the user. Note: page.order files use *.xil file names but the _Prev_ and _Next_ keys will be generated with .html extensions.
In the Xilize2 pages this feature is exploited in navBar.xilinc which is included by both header.xilinc and footer.xilinc:
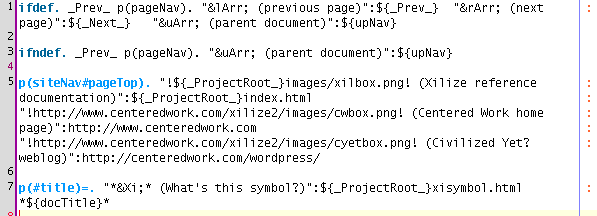
Notice:
- lines 1 and 3 contain conditional translation directives to allow for pages that don't participate in page ordering.
- lines 5 and 7 use the
_ProjectRoot_key so this file can be included in subdirectories
source files, *.xil
All of the above is designed so that .xil source file — the main content of each HTML page — is incredibly easy to write. Here is the start of a typical page in the User Guide:
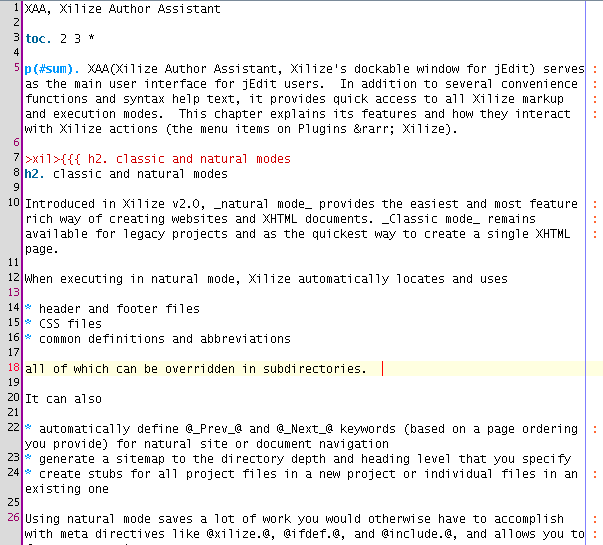
Notice:
- line 1, in natural mode, is assigned to the key
_NaturalLabel_which is used inheader.xilincto form the<h1>element of the HTML file. - line 3 provides a table of contents for the file
- line 5 is the chapter summuary
- line 8 is the first of several
<h2>sections of the page
Here's what it looks like in the Firefox browser on a Debian GNU/Linux system:
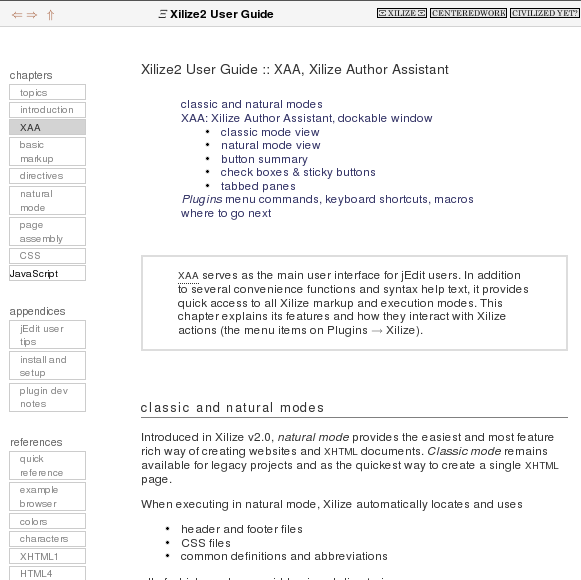
Examine each of the *.xil files used in the Xilize2 documentation and notice the similar structure.
Adding a new page is easy. The steps are
- create a new
*.xilfile- the first line will be used in the main heading
- add the
toc.line if the file needs a table of contents
- edit the
page.orderfile if the new file is to participate in the page ordering - edit the
doclist.xilincfile if you want the new file to have a link in the sidebar
classic mode notes
All of the foregoing can be accomplished in classic mode with judicious use of ifdef., define., and include. but why bother? Instead use XAA to create a natural mode project and exploit its capabilities.
However, if you need to quickly generate an HTML page there is no quicker way than creating a new file and typing
xilize.
and following it with the file contents. You might want to use an external stylesheet and use assign the page a title as well. If so, use something like
xilize. css myStylesheet.css
title my page title
One use of Xilize is to create snippets of HTML that are included in other files. In that case, don't use the xilize. directive. Xilize will generate HTML without a prolog or epilog; it will simply translate the blocks in your file.
Yet another common way to use Xilize is within HTML, PHP, JS, or other files. In these cases, you write Xilize markup and then run Ξ blocks or Ξ phrases from XAA to translate the markup in place. Run in this way, Xilize executes in classic mode.


