natural mode (for v2.0)
Xilize version 3.0 is modeless but it's default behavior is very much like what is described here.
- natural mode project creation
- autodiscovery of special files
- design strategy
- the
NaturalLabelkey - site map
- page ordering,
page.orderfile &PrevandNextkeys
In natural mode Xilize2 assumes you have a directory tree of *.xil files and requires a file with the extension .xilize in the root of that tree. The *.xilize file serves as a standard place to "define." special key/value pairs that control attributes of natural mode processing.
natural mode project creation
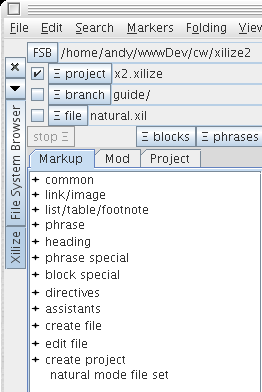
The best way to see what natural mode is about is to let Xilize generate all six stub files for you — then you can focus on content. To do that, under the Markup tab in XAA expand the create project node to see something like this:

XAA showing expansion of create project
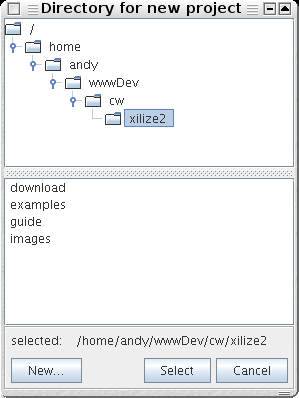
Now choose natural mode file set to launch the directory selection dialog:

Pick an existing or create a new directory. Here is the list of files created in the directory assuming you used "myProject" as the name of the directory containing the project:
- myProject.xilize
- index.xil
- common.xilinc
- footer.xilinc
- header.xilinc
- default.css
Inspect these files. Except for the *.xilize file, each contains extensive comments.
autodiscovery of special files
When Xilize processes a *.xil file in natural mode, it automatically searches for certain types of files in that source file's directory. If it does not find one of these special files, for example a CSS file, it will search up the directory looking for it until it reaches the project root folder, the folder containing the *.xilize configuration file. The beauty of this is that it allows you to create a project-wide look-and-feel which you can then override subdirectory by subdirectory.
The following sections describe each of the special files.
project configuration file, *.xilize
The configuration file can have any filename that ends with .xilize. It does two things
- marks the the location of the project's root directory
- contains a
define.directive with key/value pairs that control how Xilize processes the files in the project
There may not be two files with the .xilize extension in the same directory.
stylesheet file, *.css
Xilize looks for a file ending in .css in the current directory then, if one is not available, up the directory tree to the project root; it stops the search as soon as one is found. This file is used to create a element in the
style.css, this line will be generated:
<link rel="stylesheet" type="text/css" href="style.css" />
The proper relative file path will be used in the element in the generated HTML. If the current directory has no CSS file and its parent has one named myStyle.css, the line will be
<link rel="stylesheet" type="text/css" href="../myStyle.css" />
What this means to you as the web site designer is that if you need do nothing at all if you want the source files in a subdirectory to use a stylesheet in a parent directory. If you want to use a parent stylesheet and supply additional styles in the current directory, you can create a local CSS file with an import statement like this:
@import "../x2.css";
h2 { padding-bottom: 0.2em; border-bottom: 1px solid gray; margin-top: 2em;}
If you need to have multiple CSS files in the same directory and still want to exploit this autodiscovery mechanism, note that Xilize first looks for a CSS file named default.css.
header & footer files, header.xilinc & footer.xilinc
For each *.xil source file — and before translating any markup — Xilize will locate and insert header.xilinc and footer.inc files at the top and bottom of the source. Xilize will look first in the directory in which it finds the *.xil file. If it doesn't find a header.xilinc, for example, it will search up the directory tree looking for one — stopping at the project's root. Thus, any directory in the project can have it's own header and footer files.
common definitions and abbreviations, common.xilinc
A common.xilinc file is a place to put abbreviations and defines common to all your files in the project – or a directory of the project.
If in a subdirectory you want to add to the parent's common.xil (rather than replace it) you can use the include. directive in the local common.xilinc like this:
include. ../common.xilinc
which pulls in the parents definitions and abbreviations. You can then overrided or add to them in the body of the local common.xilinc.
Note: if the local directory is several levels down from the common.xilinc which you want to include, you can use the _ProjectRoot_ key
include. ${_ProjectRoot_}common.xilinc
which creates a relative path from the current directory to the project root.
design strategy
The motivation for the design of natural mode is based on the natural way we use use subdirectories for different purposes. Each subdirectory might hold a different document, for example, where the document is a collection of HTML pages each representing a different chapter in the doc. To give a particular doc its own style, simply create a new *.css stylesheet, header, and/or footer in its directory and nothing more needs to be done. Xilize will automatically find and use it — and no other changes to the rest of the web site need to be made. On the other hand, if you want everything in a subtree to have the same look-and-feel you don't have to do anything at all. The files in the root directory will be discovered and used.
the _NaturalLabel_ key
Usually you want to have a title associated with each HTML page and often it is the same as the page's first heading. By default natural mode will use the first line in a *.xil file as the page title and the default header.xilinc will make it the <h1> element at the top of the page. Xilize will also assign it as the value of the the key _NaturalLabel_ so you can use it elsewhere if you like.
site map
By defining the appropriate key/value pair in the *.xilize file, you can have xilize generate a site map. See the Project tab in the dockable window.
The site map function generates a file named sitemap.xilinc which, to be effective, needs to be include.'d in an *.xil source file. This can be any file but the default is assumed to be sitemap.xil. If you choose to name it something different, you will need to modify your *.xilize project configuration file to define _FileUsingSiteMap_ to the name of the file that will be including the sitemap.
Note: the sitemap will only be generated when running Xilize on the project as a whole. The Ξ branch and Ξ file commands will not generate one.
page ordering, page.order file & _Prev_ and _Next_ keys
Any directory may contain a file named "page.order" which specifies an ordering of the *.xil files (one per line) in that directory. When Xilize finds such a file it define.'s the special keys _Prev_ and _Next_ so they can be used (typically in a header or footer) to create links for the reader to page through your material in the order you specify. The Xilize2 docs are done this way.


